

Your digital footprint already exists, so why not make sure it's accurate and use it to your advantage? By maintaining your scholarly profile, you can track your author impact while also making it more discoverable. This guide will introduce you to the most common scholarly profile tools, their strengths and purposes, and help you set them up for yourself.


![]()
ORCID [Online Research Contributor ID] is an author disambiguation tool that gives you a persistent, unique digital ID so that there will be no confusion whose work is whose if someone has a similar name. This also simplifies tracking your work down if you have changed names or used variations of your name. Other benefits of ORCID include:
Did you know some journals and publishers are requiring researchers to have an ORCID? Here's a list (scroll down to Signatories). Even conferences, funding bodies, and indexing databases (e.g. Scopus, Web of Science) are using ORCID.
Choose Visibility Settings for your Profile and Share your Profile Link
1. The link to your profile is automatically generated and can be found in the browser address bar and in the upper left-hand corner of your profile page.

2. You may control how much of your ORCID record is publicly visible. For both your personal information and information about your works, three settings are available:
For more information, see Visibility Settings in the ORCID Knowledge Base, and ORCID's privacy policy.
1. What makes it different from other scholarly profile tools?
ORCID is widely used internationally in various venues. It is the central point that connects all your other profiles.
2. How do I find out if I already have an ORCID?
Search for your name in the ORCID Registry
You can control each field of your profile and select who can view: everyone, trusted parties, or only me.
4. Does ORCID host my publications and track their citations?
No, but ORCID can link to your other profiles that do this.
5. Where can I find out more information?
This is the ORCID Support page.
Why Google Scholar? Google Scholar is a simple platform that will collate your publications and citations to them. Once your profile is set up, you can choose to have it automatically updated with your new publications or you can direct it to send you an email with suggested updates for you to review and confirm.
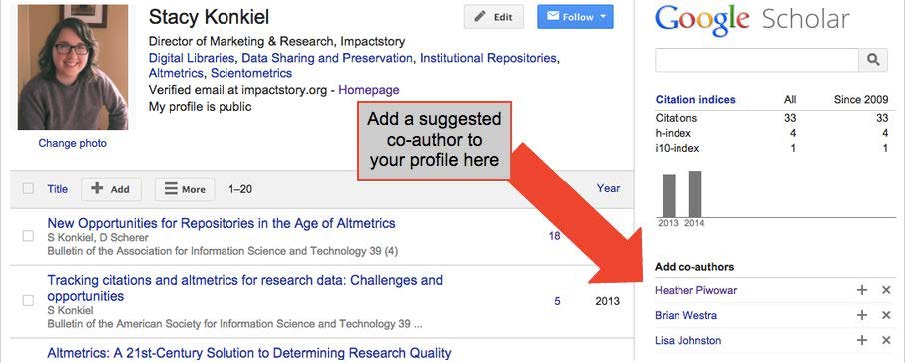
What does a Google Scholar profile look like? Below is an example of a Google Scholar profile. The list of publications can be sorted in date order or by the number of times the output has been cited by clicking on the headings. By clicking on the number of citations, you can find out which publications have cited yours. The publications can be filtered by date and relevance. Google Scholar calculates your h-index and displays a graph with number of citations to your work per year.

Another example of a Google Scholar Profile
How to set up your Profile
Step 1: Create your basic profile
Step 2: Add publications
Google has likely already been indexing your work for some time now as part of their mission as a scholarly search engine. They will provide you with a list of publications they think belong to you. You’ll need to read through the list of publications that it suggests as yours and select which ones you want to add to your profile.
Beware--if you have a common name, it’s likely there’s some publications in this list that don’t belong to you. And there’s also possibly content that you don’t want on your profile because it’s not a scholarly article, or is not representative of your current research path, and so on.
Read through the publications list and deselect any that you do not want to add to your profile (like the below newsletter item that Google Scholar thinks is a scholarly article).
Click the grey “Add” button at the top of your profile.

Confirm you want Google to automatically add new publications to your profile in the future. If you’ve got a very common name, note that this might add publications you didn’t author to your profile. But if you’re a prolific author, it can be worth it for the time it saves you approving new articles every month.
Your profile is now almost complete! Two more steps: add a photo by clicking the “Change Photo” link on your profile homepage, and set your private profile to “Public.”
Step 3: Make your profile public
Your profile is private if you’ve just created it. Change your profile visibility by clicking the link to "Make it public" under your name and title. You can also make your profile public by clicking the Edit button and selecting the box next to the words "Make my profile public."
Step 4: Add co-authors
Adding co-authors is a good way to let others know you’re now on Google Scholar. However, you can only add co-authors who have already created their own Google Scholar profiles. Google Scholar tries to find authors who have user profiles and list them for you. Thus, if you don’t see co-authors, it’s likely they don’t have Google Scholar user profiles.
To add a suggested co-author, find the “Co-authors” section on the top right-hand section of your profile, and then click the plus-sign next to each co- author you want to add.
That’s it! Now you’ve got a Google Scholar profile that helps you track when your work has been cited both in the peer-reviewed literature and, and is yet another scholarly landing page that’ll connect others with your publications. The best part? Google Scholar is pretty good at automatically adding new stuff to your profile, meaning you won’t have to do a lot of work to maintain it.
Step 5: Add missing articles
You might have articles that Google Scholar didn’t automatically add to your profile. If that’s the case, you’ll need to add it manually.
Click the “Add” button in the grey toolbar within your profile.

On the next page, click the “Add article manually” link in the left-hand toolbar. Then you’ll see this screen:
Go ahead and add a new paper to your profile. Include as much descriptive information as possible--it makes it easier for Google Scholar to find citations to your work.
Click “Save” after you’ve finished adding your article metadata, and repeat as necessary until all of your publications are on Google Scholar.
Step 6: Clean up your Google Scholar Profile data
Thanks to Google Scholar Profiles’ “auto add” functionality, your Profile might include some articles you didn’t author.
If that’s the case, you can remove them in one of two ways:
If you want to prevent incorrect articles from appearing on your profile in the first place, you can change your Profile settings to require Google Scholar to email you for approval before adding anything. To make this change:
From your main Profile page, click the “More” drop-down menu that appears in the top grey bar:

Prefer to roll the dice? You can keep a close eye on what articles are automatically added to your profile by signing up for alerts and manually removing any incorrect additions that appear. Here’s how to sign up for alerts: click the blue “Follow” button at the top of your profile, select “Follow new articles,” enter your email address, and click “Create alert.”
Step 7: Make your Profile Public and Share your profile URL
Your profile URL is automatically generated and can be found in the browser address bar. Your profile visibility can be turned on and off in the edit mode. Next to your name, click on the pencil:

Then check the box to make your profile public

Why Publons? With Publons, you will be assigned a Web of Science ResearcherID. Similar to ORCID, this will support author name disambiguation. With Publons, you can:
Example of a Publons profile
How to Set Up
1. Go to https://publons.com/
2. Click on Create a Publons Profile or Register. If you already have a sign-in for Web of Science or EndNote online, use the same email address when you register for Publons.

3. If you have an existing ORCID account and have built a list of your publications there, link your ORCID and Publons accounts so that you can import your publications to Publons. Click the green ORCID icon to begin.

4. Complete your Publons profile.
Choose Visibility Settings for your Profile and Share your Profile Link
1. In your settings, choose what you would like the public to see on your profile.

2. On your private dashboard, click the "Public Profile" link. The browser URL is the link to your profile.

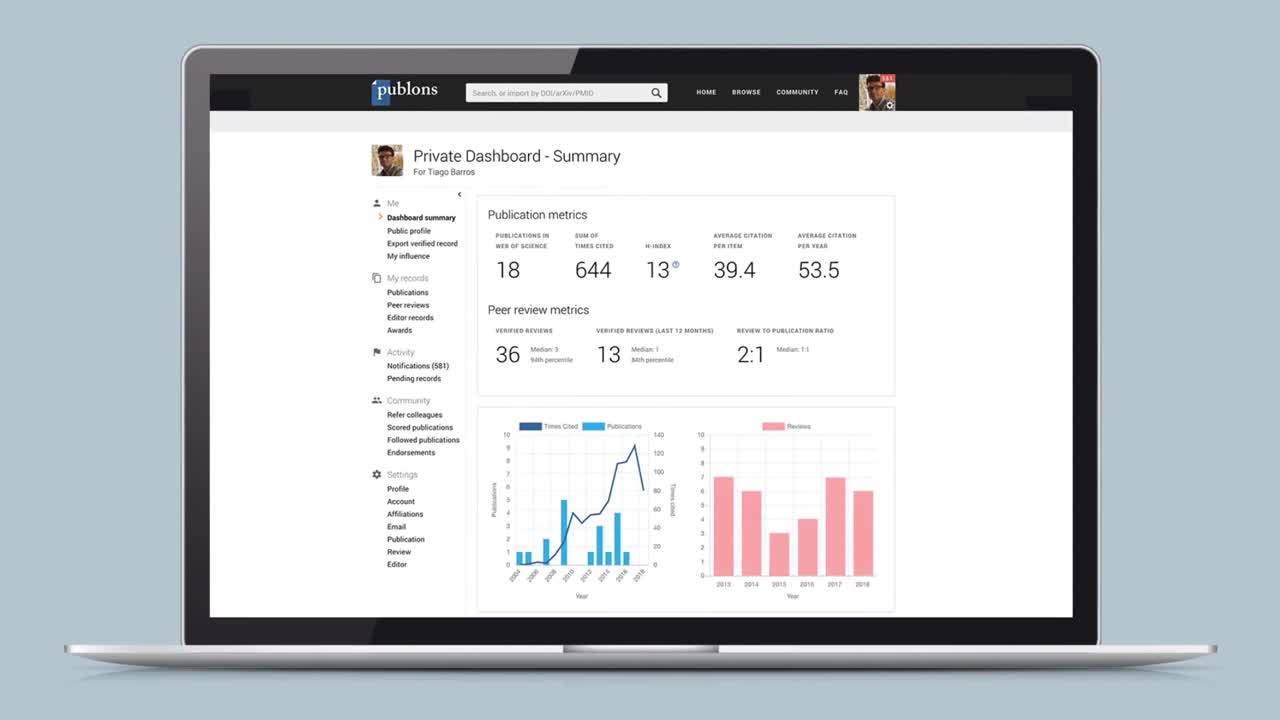
This video shows how you can quickly build your profile and add your publications and reviews.
Why SciENcv? This is a researcher profile system offered by the NIH to help researchers create biographical sketches [biosketches] for their NIH, NSF, and IES grants. It is part of your PubMed/My NCBI account. It complements My Bibliography, which helps you manage the publications you've authored. In SciENcv, you can document your education, employment, research activities, publications, honors, research grants, and other professional contributions.
Example of a biosketch
How to get Started
What about Biosketches?

The UT Libraries has created a thorough guide on how to create a biosketch and more details about SciENcv. Access it here.
Or, look at the NCBI help page for SciENcv.

This work is licensed under a Creative Commons Attribution-NonCommercial 4.0 Generic License.